In which I try, and fail (to quit trying).

This weekend was to be The Big Weekend. The Big Weekend is Video Weekend. Video Weekend means I finally, finally, FINALLY shoot the video of my newest, bestest, awesomest sculpture commission!

No. (You read the blog, headline, righ? No surprises.)

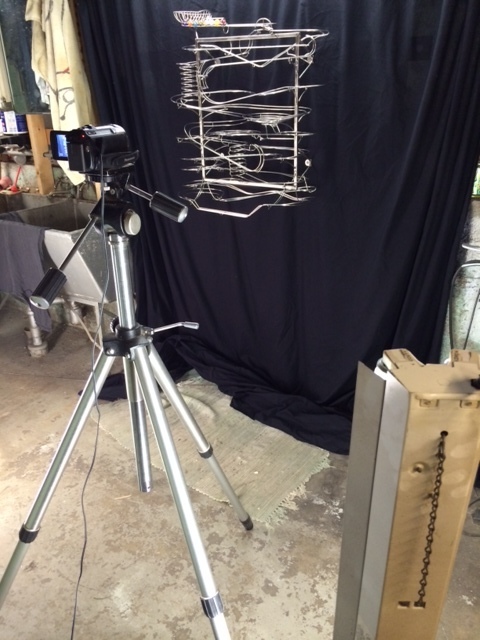
I did a lot of work to make this happen. As I had been overwhelmed with other work last week, I was really looking forward to this weekend and its abundance of free hours on Friday night, Saturday day and Sunday day to make some magic happen.

Friday night was some art marketing work that needed doing. Done. Saturday I made some good progress, though I allowed my sanity to have its own whole day and I freaked out over not having sufficient and proper lighting. Did you know that light bulbs are colored? White lights, they have color. Photographers know this, which means I know this, but I’ve been able to dodge the issue until now using various tricks or simply by ignoring it. Saturday, however, it was suddenly, disgustingly clear to me that when I put the sculpture under a ceiling halogen and side-lit it with incandescent lights I got an unbearable purple-ish hue all over everything.

Purple. Purpllllllle! Sure, maybe y’all wouldn’t notice, but I would, and I think that you would too anyway, because y’all have eyes. Plus (PLUS!!!), I had to take photos, and THOSE would DEFINITELY show purple. All. Day. Long. For the rest of my life. On my web site. To people. To people for whom I want to actually see my stuff looking nice and cool and fascinating as opposed to, “Why does that look weird? Something’s not right about that one…uh, maybe I should go check my email or look for pictures of puppies playing cards or something…”

So, no, this would do. I had to fix it. How, you ask? Recall my comment about the ceiling halogens. Good, right? And I actually HAD more halogens…on the ceiling. I didn’t see that as a problem. Only some chain and a couple hooks stand between a ceiling light becoming a side light.

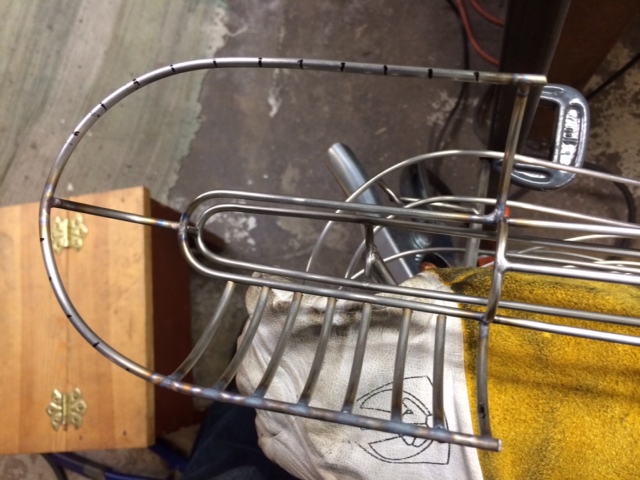
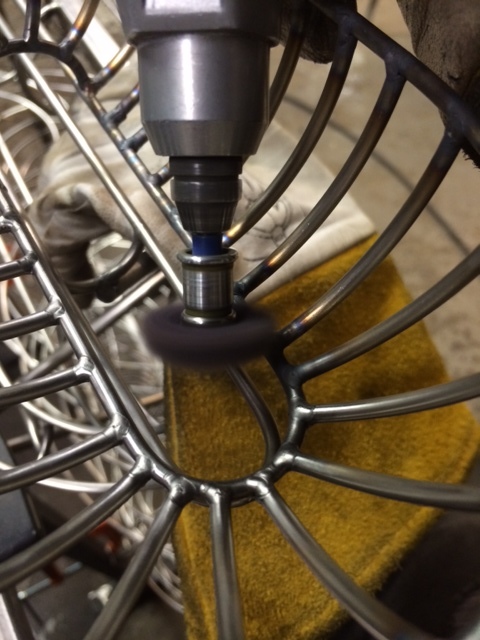
Witness my awesomeness:

Trust me, it'll look like magic when it's done!

Trust me, it’ll look like magic when it’s done!

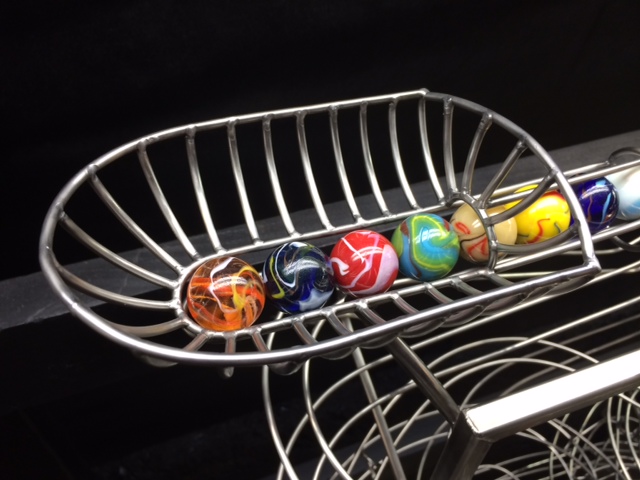
That was super nifty, but there were still details, the last of which was realizing that I needed to add the glass planters. I got them all unpacked, then realized they were horridly fingerprinted. One more thing, but I carefully washed them – oh, they had stickers on them. The stickers would not come off. I had to go find some WD40 to remove the goo. Okay, NOW they were cleaned! At that moment I realized I had to split for a band gig. So close, but Sunday would be gold!

Sunday arrived, I was up early, made it to church, then realized I HAD to get groceries lest I starve the rest o’ the week. Went and got groceries. Brought groceries home. Got all of the groceries put away except for two items. Went to put two items on cupboard shelf positioned above where glass planters were sitting on counter. Hit an almost completely empty bottle of Planters Lightly Salted Peanuts, whereupon the deadly nutty missile launched itself off the shelf and straight onto the counter top, hitting one of the planters, knocking it into the sink, and then…
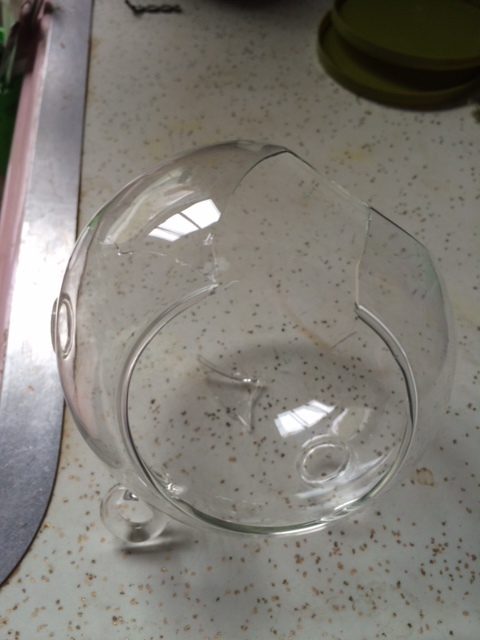
The pain! The pain!

The pain! The pain!

NOOOOOOOOOOOOOOOOOOOOOOOOOOO!

I refuse to admit defeat. I’ll get it done, and while I’m waiting for the new planter to arrive in the mail, I’m going to get other stuff done. (As my dear mum is fond of saying, “Consider your options.) I shan’t give up! Shall not give up!!!!!

Yes, it takes that long!

Sometimes I beat myself up in this whole creation process. The expense of time is something that really gets to me at present, because I don’t have near as much free time to create art as I would like to have. If I work on a project, or even a portion of one, and it takes longer than I think it should, I can be pretty hard on myself about my supposed “poorly managed time.” Most of the time this is totally unreasonable. Actually, maybe it’s always unreasonable.

rbsbasket1

Today’s post is a perfect example of that. I conceived the basket assembly shown here as a means to keep the marbles from accidentally being dropped onto the glass plant terrarium that will hang near where the marbles are loaded. It was an excellent and attractive solution to the problem. In my head it was very straightforward. It seemed like such a simple solution couldn’t take much time: basket, wires, welding. Two hours, maybe three? No.

rbsbasket2

I wound up spending hours and hours on it, perhaps six. My first reaction was, “What! How could that take so long! It’s just – it’s just a bunch of semicircles in a frame! That shouldn’t have take so long to do! I should have known better! I must not be working fast enough! How could I let all that time slip by?”

rbsbasket3

Later I stepped back and did some really quick, really basic math. There are 28 upright pieces forming the sides of the basket. Each of those pieces required on tack weld to hold it in place, so that’s 28 welds right there. Then I had to go back and tack weld them at the other end so that both ends were secure, making 56 welds.

rbsbasket4

Once everything was tacked and secured, I went back over all of them on both the inside and the outside of the basket using filler wire to create attractive finish welds that would also be completely solid and sturdy, assuring that no amount of vibration from loading the marbles would ever cause one of the welds to break. That makes four additional welds for each “leg.” Four welds times 28 equals 112 more welds. Add that to the tack welds and we have 168 welds.

rbsbasket5

Two main pieces form the upper lip. Adding those pieces to each other made for at least four more welds, probably six. Now we’re up to 174 welds.

One hundred seventy-four welds. How long does it take to make a single weld? Not too long, a few seconds at most. For many of those welds, however, I didn’t just make the weld. Most of the weld joints were not conveniently positioned. I had to move the sculpture, rotate it one way or another, lay it on its back, turn it upside down, I even had to clamp other pieces of metal onto the sculpture so I’d have a place to rest my hands while welding. That all adds to the build time.

rbsbasket6

And all of that doesn’t take into account the time I took designing it, bending the wire to the right shape, cutting and fitting all the pieces together. I was really lucky if something fit together on the first try. More often than not I had to grind things to fit just right. More time.

Oh, and cleaning! Let’s not forget the cleaning. That was fun to do after it was all burnt and ugly looking, but it still added time to the build process.

rbsbasket7

It ended up taking three or four days of available time to complete. Considering all that, well, I didn’t do too badly. Most of the pieces I create for these sculptures are completely individual, even to me. A big part of why I do what I do is the individuality and uniqueness of each piece. It means that certain things are just going to take a long time. The big benefit to all that effort, however, is that not even I can create two works that will be exactly alike. I hope the results speak for themselves.

rbsbasket8

So I’m going to keep practicing not being so hard on myself, save time where and when I can, and keep working to produce truly unique and special pieces of moving art. How’s that sound?

Challenging myself and new sculpture video for “Dropping In”

It has been a tremendously productive past few months, and here is one more result of my decision to create one new piece a week for as long as possible. There’s been a change in plans, but I’ll fill you in on that later. For now, news and video on the new sculpture!

Titled “Dropping In,” I deliberately made an effort to create something different with this one. I’d had a thought around the beginning of the year for a method of creating track that would be rather quick, but also brought with it some limitations. However, limitations always translate into a pattern of thought like this: “Hmmm…I could do that, but that would mean I couldn’t do these other things. Huh. What if I couldn’t do those other things? That seems like a bad thing, but it just means I have to find another way of reaching my goal. If I can’t do X, then…then the challenge is to find a Y that will resolve the issue, and quite possibly be awesome in the process!”

This line of thinking worked its way around in my head for a while. Then “Lunar Walk” showed up on my work bench piece by piece, and I realized it was time to play around with some of those ideas. Turns out they worked pretty well! The sculpture looks really cool and is different from what you very often see with rolling ball sculpture. I enjoyed building it and its function. Even better, when other people got a look at it, they liked it as well. Success!

Once that piece was done I was ready to engage in my idea 100%. I was going to make a bunch of perfectly straight track sections in a whole batch and then…well, I didn’t know what, but there was only one way to find out!

Turns out it really was a challenge. Curves create a certain type of feel. They also allow for gradual changes in depth and speed. I was losing a lot of advantages in some areas, but it just made me more determined to figure out something cool with my idea.

I suppose I could have made my track sections bowed or wavy, but I really wanted to go with the idea of making this piece with nothing but straight, flat track. I could see something in my head that really wanted to take shape. Once I started laying the completed track sections out on the work bench, things really began clicking. The “steps” portion of the sculpture just seemed too perfect, and I was getting excited about the bigger challenge of keeping the track only gradually sloped so that the marble wouldn’t roll too quickly. Anyone who builds RBS will tell you that controlling roll speed at a slow pace is difficult!

When the basic track route was laid out I started welding some of the pieces together. I had no specific frame in mind, but once I started looking at the steps taking shape it snapped in place: strutted uprights! I immediately thought, “Oh, man, now you’ve done it. That’s going to take a LOT more time!” Remember, I was trying to get this piece done within one week. Just building one upright with struts is time-consuming, but here I had the idea for a triangulated piece. That was going to take even more than triple the time it took to make a single-sided one! Nevertheless, I knew the idea was perfect. I couldn’t NOT build it after having seen it in my head.

Hours of work followed. The uprights turned out great, but required a good deal of patience in setup and welding to keep them from warping horribly. The track worked with the frame visually even better than I could have hoped! Keeping the track sections slanted at just the right angle took additional patience and lots of adjustment, but once I had it working it was right on.

I’m very pleased with the end result on this one. I imagine that it is not to the taste of everyone, but I appreciate its uniqueness, and I’m sure there is someone else that feels this one is just right for them. I was also struck with the idea that the open area in the sculpture could be used as a mounting point for an award or a photograph that I could add at the client’s request. I know if I worked somewhere, say an engineering firm, and I was given this piece of art with a plaque affixed to it, I’d be a lot happier than if I got the usual brass and wood plaque from a trophy shop. This is one to remember! Plus, every single person coming in the office would want to play with it! How many other trophies can do that?

As mentioned earlier, my goal has been one new piece a week for several month’s worth of time. I have just received two new sculpture commissions, both of which have me extremely excited! These are larger works that will take some time to complete, so the small pieces will be on hold for a while, but I will continue to update here with other news as I have it.

Thanks to everyone who supports my work. I appreciate your efforts in forwarding my videos and putting up comments on various internet outlets. You help me do bigger and better things!

New Sculpture Video: “The Good Bean” National Kidney Foundation Fundraiser

I’ve had my shoulder up against things, pushing to get work accomplished, and I have more to show for it! Here we have another super-cool video of a great piece I did as part of a fundraiser for the National Kidney Foundation. It’s called “The Good Bean” (lots of health professionals refer to kidneys in slang as “beans,” so there ya go!), and the frame is shaped to mimic the NKF’s logo.

You always want to produce something that is going to please people, make them happy and proud to be the caretaker of your work. Smaller sculptures can sometimes be a challenge, just because they are brief, and you can’t do things like broad, sweeping curves or extremely tall coils and the like. I wanted to come up with a little something that would set this one off and make it unique.

The answer came in the form of the widening track drop-through, the part where the marble rolls out to the end of the straight piece of track, and just when you think it’s going to shoot right off the end, it slips between the rails and drops down onto the track below it. This can be a very tough element to get functioning properly, as it’s all about the tolerances, and as I’ve mentioned before, marbles are neither round nor the same size. Since I was working with a single marble, this suddenly made the whole deal a lot easier, and I knew this element would be the perfect highlight for “The Good Bean.”

Not to neglect the rest of the sculpture, I created some very nice curves plus a pretty darn large spiral that took ten feet of wire to create. The end result is a really fabulous desktop piece. The woman who won the contest is very happy to have received it, and I’m glad it went to someone who will get lots of enjoyment out of it.

Check out the video below to get the real effect. Please feel free to contact me if you’d like to discuss a piece for yourself. I’d be happy to discuss the possibilities.

“Lunar Walk” new sculpture completed with video!

It has been a very full day for yours truly, but the sculpture video must be posted before another moment passes! Especially this one, because it is a bit of a departure for me in some ways. You’ll see what I mean, and I’m sure you’re going to check it out!

I have been trying to keep the price of this series of sculptures right around $200, but Lunar Walk just begged for a little extra treatment, and I had to do it right. It’s slightly higher at $300, but still a very reasonable office piece and well worth all the effort I put into it. Do you know anyone else who has something like this? No! And you very likely won’t anytime soon either. Now how cool is that?

I’ll let the video speak for itself. I do hope you enjoy it. I loved the creative stretching this piece afforded me. Oh, and take special note of that crescent moon frame as well as the relaxed pace of the action, both characteristics for which this piece was named.

)

“Opportunity” Rolling Ball Sculpture Completed!

It has taken me nearly a year and a half to create, but my largest, most ambitious rolling ball sculptured, “Opportunity,” is finally complete! A commission received back in November of 2011 started the whole project moving. Since it was of a size and scope that I’d not tackled before, I had to make some adjustments. I had to tear out a shower that someone had built in my basement back in the 60s. I had to install more shop lighting. I had to build a wooden frame onto which I could mount the sculpture as I built it. There was a lot of work to be done before any work got done!

Finally, however, it got down to the real sculpture work, and I learned how to square a frame and how to weld a frame without having it tweak itself out of alignment. That was the barest tip of the iceberg in all the learning experiences I had with this piece, and some of them felt extremely unpleasant. I’m the wiser for it, however, and even when things seemed at their worst, even when I welded something on and then hated it and wanted to tear it off (friends said leave it alone, so I did, and they were right), I kept moving forward and the end result is nothing short of fantastic!

This piece is exactly the sort of thing I wanted to build when I first laid eyes on Eddie Boes’ “Island Exploration” video. It’s the sort of work I’ve been dying to do even when I was first learning on copper at my dining room table. I was able to push myself farther, create more, show the world more of what I am capable of building than with anything previous. And you know what? I’ve still barely scratched the surface. This one is wonderful, and I am happy and proud to have completed it, but if you think I’m going to rest on my laurels, well, you couldn’t be more wrong.

The response to this video has, in the space of hardly a week, been outstanding for me personally. Over 1,000 views already, and it hasn’t stopped! Please take a look, share it with friends and add a comment if you like. It would be a big help toward me pursuing my art and creating even grander pieces.

New Sculpture Video! It’s a Ringer.

I am excited to report that I have recently completed a small rolling ball sculpture. This piece had several new challenges for me. For starters, it is a very small piece, measuring 6″x11.5″x6.5″. That’s not a lot of space in which to make things interesting! To accomplish that I used several pieces of scrap steel that I claimed out of the scrap heap at work. Visually, this piece has some real fun stuff going on.

Secondly, the sculpture is composed entirely of mild steel, which means it will rust if not coated with something that serves as a moisture barrier. I could have used standard paint, but that would wear away after a while where the marble rolls. Plus, regular paint just isn’t what I wanted to use, and I didn’t want it to change the color of the metal. I really wanted it to not look like it was painted! It took some internet searching, some phone calls, some driving, plus a little hit-and-miss investigation, but I feel fortunate to have found a place that was actually excited about taking on my odd little challenge to them: “See, it has this marble that rolls around, and the marble hits one part and rings. It has to keep that ring even after it has been painted.” They actually got a kick out of that whole idea, gave me a nice trial price to allow me to test their electrostatic paint process, and I’m pleased to say this thing looks fantastic! You can’t tell it has been painted, and the ring is great! Things went so well I am planning on doing a series of these pieces priced right around $175.

At any rate, I’ll let the video fill in all the blanks. Likely you are really curious to see what I’m fussing about.

Dremel Finishing Abrasives for Metal Sculpture

I have been experimenting with several different small abrasive buffs for my Dremel. I used these to clean up the discolored spots on a welded stainless steel sculpture as I wanted this piece to look rather uniform in color. I took the time to make notes on which ones I liked for my own reference, but it occurs to me that others may benefit from this information, so I decided to make a post out of it. As with anything of this nature, you may have different preferences as far as finish goes. These are the tools I tried and my impression of how they suited my needs. Maybe it will give you a good start in your search for some appropriate abrasives for your project.

NOTE: When I reference “my finish” I should state that the sculpture pieces were individually cleaned with a scrub pad before they were welded together. The piece overall had a satin sort of look to it, so this was what I was looking to duplicate when cleaning weld joints.

Dremel 512E – Fine Grit (320) Buff – Good results. Removes discoloration acceptably and leaves a clean satin finish that is close to the finish already present on my sculpture.

Dremel EZ473 SA – 220 Grit Detail Brush – This tool looks like a fan wheel made of curved rubber fingers. It leaves a clean satin finish. It does not seem to remove any metal. It gets some spots that a buff cannot reach, but it misses others. It is rather durable and lasts a fair while, probably as long as a buff or possibly a bit longer. It is acceptable as a buff substitute.

Dremel 530 – Stainless Steel Brush – This tool has stiff bristles and looks just like a tiny wire wheel. (Dremel makes a standard steel brush, but don’t use it on a stainless as it will discolor the metal and contaminate it as well.) The stainless steel brush works well on tough spots, but the brush itself is narrow and touches only a small area. It is not good for large areas as you end up with a brindled or sort of tiger-stripe look when trying to even out the appearance of the finish. It will get in narrow spaces well.

Dremel 511E – Package combines one Medium on Coarse Abrasive Buff – Why they don’t sell just

New sculpture video!

I am very pleased to announce that I have completed a video of my latest sculpture, Triangle Twist. This is the first all-steel piece that I have completed and the first to have a decent quality video made of it as well. It is all stainless steel with 1/8″ rod for the main track plus some stouter rod for the pyramid frame. I also threw in some perforated sheet stainless for some fun visual variety. Take a look below, and feel free to comment and let me know what you think. If you care to purchase this piece, you may find further information on my main site here: http://tomharold.com/works/948091/triangle-twist

You may also subscribe to my Youtube channel for future video updates, and I have a Facebook page that you can “like” for other info as well.

Thanks for reading. I hope you enjoy the video.

Getting things done

Doing this kind of work, lots of times there just isn’t “the way that it’s done.” Sure, there might be “a” way that it’s done, but not “the” way. And lots of times a way that worked before won’t work again, because something else is different, like now you’re against a wall whereas before you had plenty of space behind the thing, or before you had plenty of running room following the thing you want to do, but this time you only have, say, three inches, and the ball will be going much to fast to make that happen, whatever “that” or anything else may be.

I’m sure you get my point. Lots of times I take photos for my own remembrance of things…although cataloging them would probably be an excellent idea. Well, never mind that for now, at least many of them are showing up here. Matthew Gaulden and Vic Chaney both mentioned specifically that it’s important to write down how you figured out a way to solve a problem, because lots of times you come across that same problem again, but you can’t remember how you solved it the first time!

Here’s a common problem: holding a couple things together so they can be welded. I solved it in a rather unstupendous but quick and easily repeatable way. I used a bunch of my steel blocks (again I say “YES” to my wonderful habit of picking these things up on instinct whenever I run across one) and just stacked them all up so they would hold these two pieces of solid bent rod in alignment long enough for me to tack weld them.

It’s really hard to see (I congratulate myself on making a very close joint!), but look at the small stretch of rod that is closest to the table’s surface and positioned between the two sets of blocks. If you look closely you can see the parting line where those two pieces have yet to be welded. It turned realllllly nicely, I am very happy to say. That doesn’t always happen. It worked, though, and this thing now holds up a couple of different pieces of the sculpture, including two loops from the loop-the-loop section. It holds up some neater stuff that I’ll show a bit later. Until then, best of luck in your creative pursuits.

rolling ball sculpture construction